


 VEVOR
VEVOR GoFort
 OutSunny
 ANTARCTICA Gear
Tired of sitting in chairs that leave you feeling stiff and uncomfortable? A hammock chair might be the relaxing upgrade you need. Whether you’re hanging it indoors from the ceiling or outside from a sturdy tree, the process is simple: wrap a strong rope or tree strap around your support (such as a ceiling beam or branch), then connect it to the hammock chair using a carabiner or a secure knot. This guide will walk you through each step, allowing you to safely hang your hammock chair and transform any space into a cozy retreat.

What You’ll Need to Hang Your Hammock Chair Safely
Before starting any installation, gathering the right equipment is crucial. Having the correct tools and hardware not only simplifies the process but also ensures the long-term safety and stability of your hanging chair. When you select your hammock chair, please always check its specific weight capacity and recommended hanging instructions.
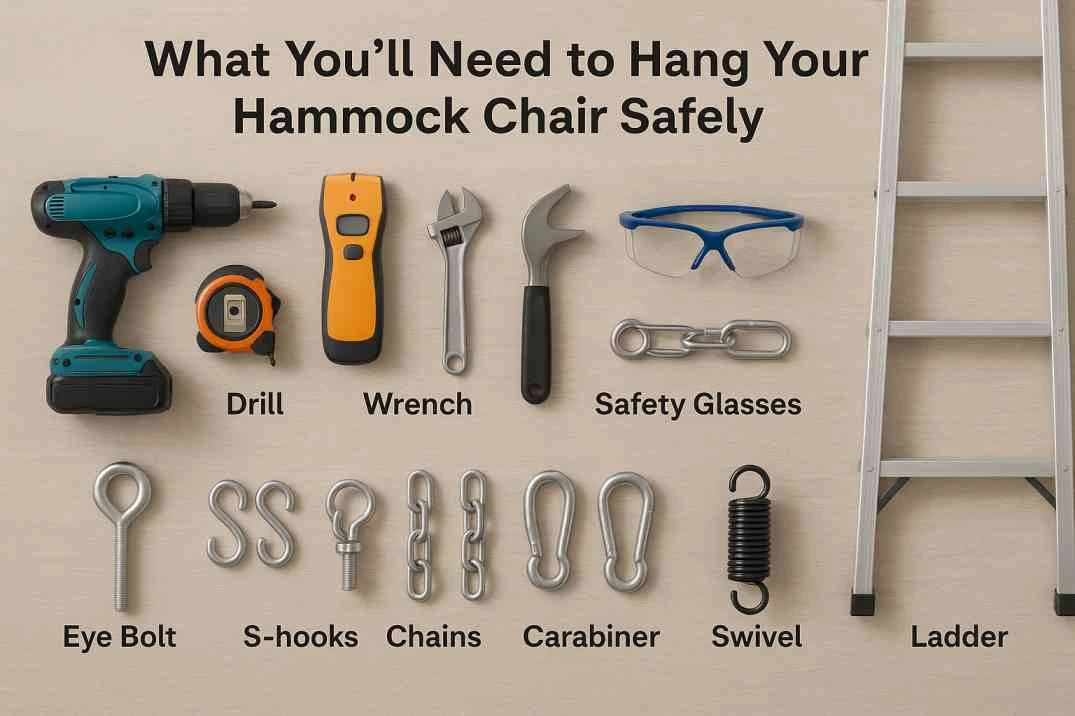
Essential Tools for Every Hanging Chair Installation
Using the appropriate tools is foundational for a secure installation, whether you’re setting up a hanging seat indoors or a hanging swing chair outdoors.
- Drill: Necessary for creating pilot holes and securing mounting hardware.
- Stud Finder: Used to accurately locate ceiling joists or wall studs, ensuring you drill into a structurally sound point.
- Measuring Tape: Essential for determining clearance, height, and precise anchor point marking.
- Wrench: For tightening eye bolts and other threaded hardware.
- Ladder: Provides safe access to the ceiling or high anchor points.
- Safety Glasses: Protect your eyes from dust and debris during drilling.
Selecting the Right Hammock Chair Hardware & Mounts
Choosing the correct hardware is as important as the installation process itself. This hardware will bear the full weight of your hammock chair and its occupants.
- Eye Bolts: Robust bolts with a looped head, designed to be screwed into wood or used with anchors in concrete.
- S-Hooks: Versatile connectors used to link chains or ropes to eye bolts or other components.
- Chains/Ropes: Used to adjust the hanging height and connect the chair to the primary anchor. Ensure they are rated for the required weight.
- Carabiners: Strong, metal clips often used for quick and secure connections, particularly with tree straps.
- Swivels and Springs:
- Swivels: Allow the chair to rotate freely, preventing tangling and reducing stress on the anchor point. Use them if you want your chair to spin.
- Springs: Provide a gentle bounce and absorb shock, enhancing comfort and reducing strain on the hanging components. They are optional but add to the experience.
- Importance of Weight Capacity: Always verify the weight capacity of your hammock chair, every piece of hardware (eye bolt, chain, spring, swivel, carabiner), and your chosen anchor point (ceiling joist, beam, tree branch). The weakest link determines the overall safe load. Exceeding these limits risks serious injury.
Pre-Installation Safety Checks: Don’t Skip This!
Prioritizing safety before you even pick up a drill can prevent potential hazards and ensure a stable setup for your hanging chair.
- Checking the structural integrity of your chosen spot: For ceilings, this means confirming the presence of a solid wood joist or adequate concrete. For trees, confirm the branch is live, healthy, and of sufficient diameter.
- Matching hardware to your specific hammock chair: Ensure all components are compatible in terms of size, material, and, critically, weight rating.
- Understanding the “hang hammock chair” basics before drilling: Take time to visualize the setup, measure clearances, and read all instructions for your specific chair and hardware. If you have any doubts about the structural soundness of your chosen spot, consult a qualified builder or structural engineer.
How to Hang a Hammock Chair Quickly & Securely
Wrap a rope, tree strap, or other suspension securely around the tree trunk or branch. Then, use a knot, a carabiner, or other hardware to attach the suspension to the eye (end loops) of the hammock. This process applies whether you hang a chair from a ceiling or outdoors.
Step 1: Select Your Ideal Hanging Location
Choosing the right spot is more than just aesthetics; it’s about safety and functionality.
- Action Point 1.1: Identify the general area. Consider where you most desire a comfortable, private spot for relaxation – indoors (bedroom, living room, office) or outdoors (patio, garden, balcony).
- Action Point 1.2: Ensure ample clearance. Your hammock chair will swing and move. Allow at least 2-3 feet (60-90 cm) of clear space around the chair in all directions to prevent it from hitting walls, furniture, or other objects.
- Action Point 1.3: Determine indoor hanging type. For indoor setups, this typically means identifying a ceiling joist, a sturdy beam, or a reinforced concrete slab. Drywall alone is never sufficient.
Step 2: Determine Your Desired Hammock Chair Height
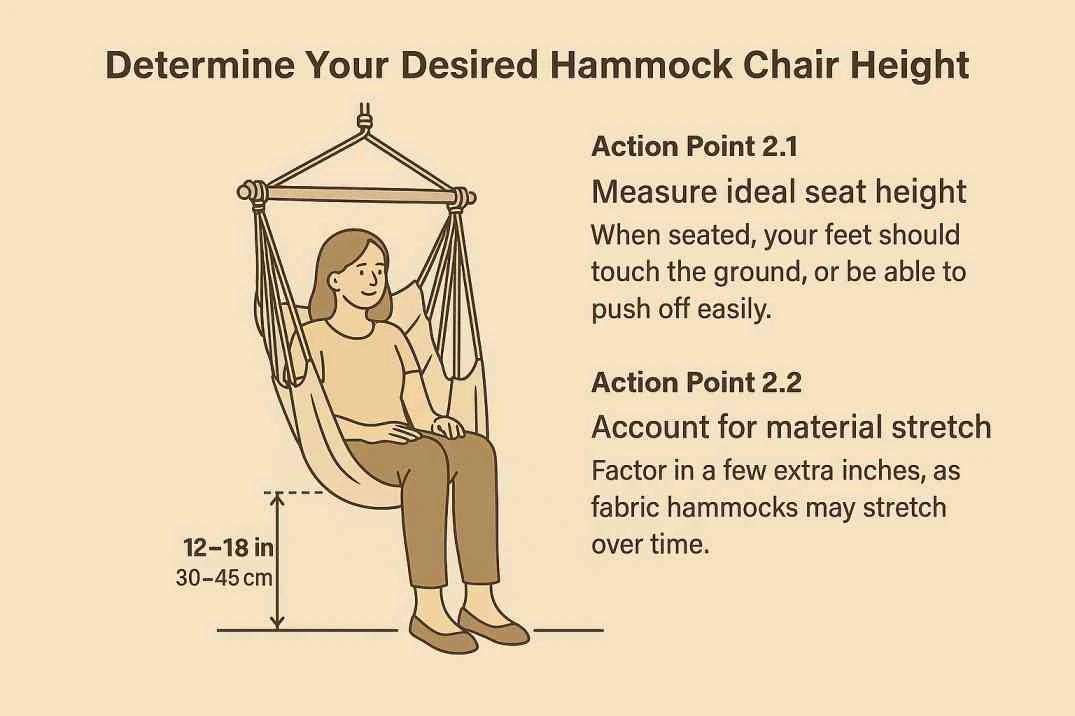
Proper height ensures comfort and ease of use.
- Action Point 2.1: Measure ideal seat height. When seated, your feet should comfortably touch the ground or be able to push off easily. A common recommendation is for the bottom of the chair to be 12-18 inches (30-45 cm) off the ground when someone is sitting in it.
- Action Point 2.2: Account for material stretch. New hammock chairs, especially those made from fabric, will stretch over time, causing them to hang lower. Factor in a few extra inches of initial height to compensate for this.
Step 3: Locate and Mark Your Precise Anchor Point
Accuracy here prevents multiple drill holes and ensures maximum security.
- Action Point 3.1 (For Ceilings/Walls): Use the stud finder to locate the joist/stud center. Move the stud finder slowly across the ceiling until it indicates a joist or stud. Mark both edges, then find the precise center.
- Action Point 3.2 (For Concrete Ceilings): Identify precise drilling spot. For concrete, ensure no pipes or electrical conduits are running through your chosen spot. A professional scan might be required for absolute certainty in older buildings.
- Action Point 3.3 (For Trees): Select a healthy, strong branch. Look for a live, robust branch that is at least 6-8 inches (15-20 cm) in diameter and appears free of rot, cracks, or disease. It should extend horizontally or slightly upwards.
- Action Point 3.4: Mark the exact spot. Use a pencil to mark where your pilot hole will be drilled or where your tree strap will be positioned.
Step 4: Drill the Pilot Hole for Your Anchor
This step sets the stage for a secure installation.
- Action Point 4.1: Select the correct drill bit size. The drill bit size for pilot holes must be slightly smaller than the diameter of your eye bolt or anchor to allow the threads to bite firmly. Refer to your hardware’s instructions.
- Action Point 4.2: Put on safety glasses. Always protect your eyes from falling dust and debris.
- Action Point 4.3: Use the ladder safely. Ensure the ladder is stable on a level surface before climbing. Have someone spot you if possible.
- Action Point 4.4: Drill straight pilot hole. Drill slowly and steadily, keeping the drill perpendicular to the surface. For deep holes, withdraw the bit occasionally to clear debris.
Step 5: Install Your Primary Hanging Hardware (Eye Bolt/Tree Straps)
This is where your main anchor goes in.
- Action Point 5.1 (For Wood): Screw in eye bolt. Insert the threaded end of the eye bolt into the pilot hole. Use a wrench or a screwdriver inserted through the eye for leverage to twist it in until the eye sits flush against the wood.
- Action Point 5.2 (For Concrete): Insert anchor and eye bolt. For concrete, first drill the pilot hole as instructed for your specific concrete anchor (e.g., sleeve anchor, wedge anchor). Insert the anchor, then thread the eye bolt into it and tighten according to the manufacturer’s instructions.
- Action Point 5.3 (For Trees): Wrap tree straps and attach carabiner. Loop wide tree-friendly straps around the selected branch. Thread one end of the strap through the loop of the other end, pulling it tight. Attach a heavy-duty carabiner to the end of the strap that will connect to your chair’s suspension.
Step 6: Assemble Auxiliary Hanging Components
These components add adjustability and comfort.
- Action Point 6.1 (If using Swivel): Attach swivel. Connect the top of the swivel to the eye bolt or carabiner.
- Action Point 6.2 (If using Spring): Attach spring. Connect the spring to the bottom of the swivel (if using) or directly to the eye bolt/carabiner.
- Action Point 6.3: Attach a chain or rope to the lowest component. Securely attach your chosen chain or rope to the bottom of the spring, swivel, or directly to the eye bolt/carabiner, depending on your setup.
Step 7: Connect Your Hammock Chair to the Setup
You’re almost ready to relax!
- Action Point 7.1: Position chair. Hold your hammock chair up to the hanging components.
- Action Point 7.2: Attach chair to chain/rope. Connect the top loop or ring of your hammock chair to the chain or rope using an S-hook or carabiner.
- Action Point 7.3: Adjust hanging height. Most chains allow for height adjustment by hooking into different links. If using rope, ensure it’s securely knotted at the desired length. Re-check the 12-18 inch ground clearance.
- Action Point 7.4: Ensure visual balance. Stand back and check that the chair hangs straight and looks balanced in its location.
Step 8: Perform the Critical Weight Test for Safety
Never skip this step. Your safety depends on it.
- Action Point 8.1: Gradually apply weight. Slowly and gently put increasing weight onto the chair. Start with about 50 pounds of weights (sandbags, books, etc.).
- Action Point 8.2: Listen for sounds, observe stress. Listen for any creaking, cracking, or unusual sounds. Observe the anchor point and hardware for any signs of strain or movement.
- Action Point 8.3: Slowly sit into the chair. If the initial weight test passes, carefully sit into the chair, keeping your feet on the ground initially. Slowly shift your full weight onto it.
- Action Point 8.4: Test stability; re-evaluate if unsure. Gently rock and shift your weight. If you feel any instability, hear concerning noises, or have any doubts, stop using the chair immediately. Re-inspect all components and the anchor point. If still unsure, consult a professional.
- Action Point 8.5: Enjoy if secure. Once you are confident in the security and stability of your installation, it’s time to enjoy your new hammock chair!
Specific Methods to Hang a Chair Anywhere
Beyond the general steps, different environments require specific approaches.
How to Hang a Chair from the Ceiling (Wood Joists)
Hanging chairs that hang from the ceiling require a strong, hidden support structure.
- Detailed guide for finding and drilling into ceiling joists:
- Use a reliable stud finder to locate the center of a ceiling joist. Joists are typically spaced 16 or 24 inches apart. Mark the exact center.
- Confirm the joist’s direction and ensure it’s solid wood.
- Drill a pilot hole (slightly smaller than your eye bolt’s diameter) straight into the center of the joist. Ensure the hole is deep enough for the eye bolt to fully thread in.
- Secure the mounting hammock to the wood:
- Screw a heavy-duty eye bolt into the pilot hole. Use a wrench or a sturdy tool through the eye to get good leverage and tighten it until it’s flush with the ceiling, ensuring it’s fully seated and secure.
- Attach your chosen suspension system (swivel, spring, chain) to the eye bolt, then connect your hammock chair.
Mounting Hammock to Concrete Ceilings
Concrete ceilings offer strong support but require specialized hardware.
- Using specialized concrete anchors/expansion bolts:
- You will need concrete-specific hardware, such as a concrete expansion bolt with an eye, or a heavy-duty toggle bolt designed for concrete (though expansion bolts are generally preferred for higher weight capacities).
- Ensure the hardware’s weight rating exceeds your chair’s maximum load.
- Step-by-step for a sturdy attachment:
- Drill a pilot hole into the concrete using a hammer drill and a masonry bit of the correct size for your anchor.
- Clear all dust from the hole.
- Insert the concrete anchor following the manufacturer’s instructions (e.g., tap in sleeve, expand wedge).
- Thread the eye bolt into the installed anchor and tighten it securely until it is fully set and stable.
- Proceed with attaching your suspension components and the hammock chair.
Outdoor Hanging Chairs for Outside: Trees, Porches & Pergolas
Enjoying a hanging chair outdoors offers a connection to nature.
How Do You Attach a Hammock to a Tree?
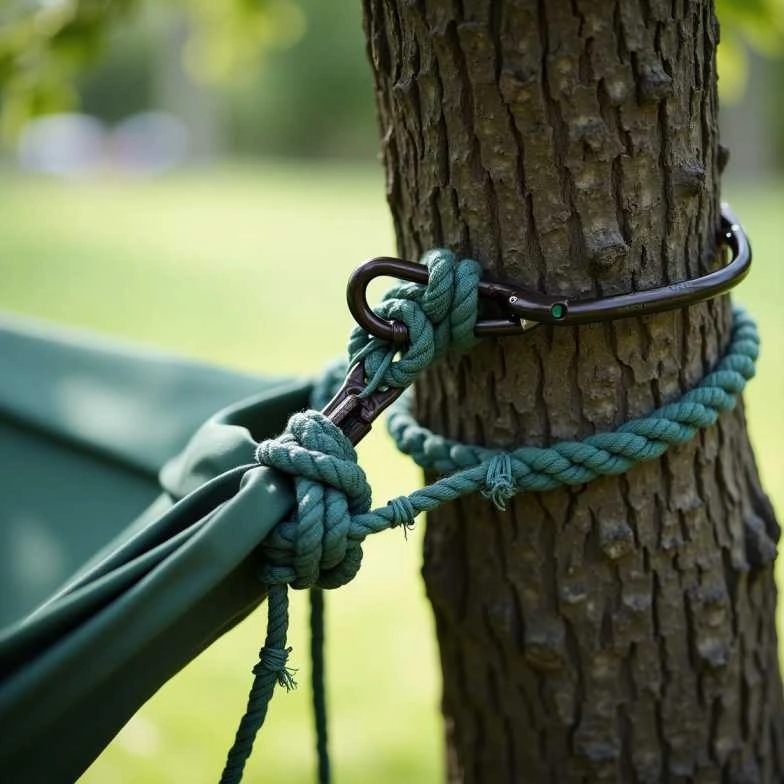
Hanging hammock chairs from a tree provides a natural and often simple solution.
- Selecting a strong, healthy branch:
- Choose a live, healthy hardwood tree (like oak, maple, or ash) with a branch that is at least 6-8 inches (15-20 cm) in diameter.
- The branch should be free of decay, cracks, or dead spots, and should extend horizontally or with a slight upward angle, capable of bearing significant weight.
- The branch should be high enough to allow the chair to hang at the desired height with proper clearance.
- Best practices for using tree straps (preferred over rope to protect the tree):
- Wide, flat tree straps are highly recommended over thin ropes or chains, as they distribute weight more evenly and prevent girdling or damage to the tree’s bark and growth.
- Loop the tree strap around the branch. Many straps have multiple loops or a system to adjust length.
- Ensure the strap is snug but not overly tight.
- How to hook a hammock to a tree securely without damage:
- Once the tree strap is secure, attach a heavy-duty carabiner to the loop of the strap.
- Connect the top loop of your hammock chair (or its suspension chain/rope) directly to this carabiner.
- Double-check all connections and perform a thorough weight test before full use.
Hammock in Patio & Porch: Secure Beam Installation
Hanging patio chairs can transform outdoor living spaces.
- Attaching to overhead wooden beams or pergola structures:
- Similar to indoor wood ceiling installation, locate a robust wooden beam in your patio cover, porch, or pergola.
- Ensure the beam is structurally sound, free of rot, and capable of holding the required weight.
- Drill a pilot hole into the center of the beam and screw in a heavy-duty eye bolt until it’s flush and secure.
- Ensuring weather-resistant hardware for your “hanging patio chair”:
- For outdoor use, always select hardware made from corrosion-resistant materials, such as stainless steel or galvanized steel, to withstand the elements and prevent rust.
- Regularly inspect outdoor hardware for signs of wear or rust and replace if necessary.
Flexible Solution: Using a Hammock Chair Stand
A hammock chair portable stand offers ultimate flexibility and is a great alternative to permanent installation.

Why Choose a Stand for a Hammock Chair?
Choosing a stand for your hammock chair comes with several benefits.
- Portability, no drilling required: A stand means you don’t need to drill into any structure, preserving your property and making it ideal for renters. You can easily move your hammock chair portable stand to different locations, whether indoors or outdoors, following the sun or shade.
- Ideal for “hammock chair portable” use: Perfect for those who want to relocate their relaxation spot from the living room to the patio, or even take it with them for temporary setups.
Types of Chair Hammock Holder Stands

Different designs of chair hammock holder stands offer various aesthetics and functionalities.
- C-stands, X-stands, tripod designs:
- C-stands: Offer a minimalist C-shape design, allowing for easy entry and exit.
- X-stands: Provide a wide, stable base, often good for larger chairs.
- Tripod designs: Feature three legs for stability, often a stylish choice.
- Matching stand to chair type and weight: Always ensure the stand you choose is compatible with the type and size of your hammock chair and, crucially, that its weight capacity exceeds the combined weight of the chair and its intended users.
- “Swinging chair on stand” assembly tips: Most stands come with assembly instructions. Follow them carefully, ensuring all bolts are tightened and the stand is stable on a level surface before hanging the chair.
Maintaining and Caring for Your Hammock Chair
Your new hammock chair is built for comfort and relaxation, and with a little care, it will provide enjoyment for years. Regular maintenance helps preserve its beauty and structural integrity. Depending on the material, cleaning may involve gentle spot treatments or machine washing (check manufacturer guidelines). For outdoor chairs, consider bringing them indoors during harsh weather or prolonged periods of non-use to prevent fading and wear. Routinely inspect all hardware, ropes, and fabric for any signs of fraying, rust, or stress, and tighten connections as needed. Addressing small issues promptly can prevent larger problems and ensure your chair remains a safe and inviting retreat.
How to hang a hammock chair – FAQ
Here are common questions about hanging hammock chairs.
Q) How much weight can a ceiling joist (or tree branch) hold for a hanging chair?
Ceiling joists typically can hold 200-300+ lbs, but this depends significantly on their size, spacing, condition, and the overall structural integrity of the ceiling. For a live, healthy tree branch, a diameter of 6-8+ inches is generally considered the minimum for safe hanging. Always consider the dynamic load (weight when swinging or moving), which is higher than the static load. If unsure, consult a qualified professional.
Q) What’s the ideal height and clearance for a hammock chair?
The ideal height is for the bottom of the chair to be 12-18 inches (30-45 cm) off the ground when seated. For clearance, allow 2-3 feet (60-90 cm) of unobstructed space around all sides of the hammock chair to allow for comfortable swinging and prevent bumping into objects.
Q) Can I hang a hammock chair if I don’t have exposed beams or joists (e.g., in an apartment with drywall)?
Never hang a hammock chair directly into drywall or plaster alone. These materials cannot support the necessary weight. You must locate and drill into a solid wooden joist or stud behind the drywall, or use a specific concrete anchor for concrete ceilings. For apartments, professional reinforcement might be needed, and landlord permission is often required before making any modifications.
Q) What type of hardware do I need to hang a chair, and where can I buy it?
You generally need a heavy-duty eye bolt (or specific concrete anchor), an S-hook, carabiners, and a strong chain or rope for height adjustment. A swivel and spring are highly recommended for added comfort and preventing tangling. You can purchase this hardware at most hardware stores, home improvement centers, or specialized hammock retailers. Always ensure all components have a weight rating that matches or exceeds your hammock chair’s capacity.
Q) How do you attach a hammock to a tree without damaging it?
To prevent damage to a tree, always use wide tree straps instead of thin ropes or chains, which can girdle the tree as it grows. Select a healthy, strong branch (at least 6-8 inches in diameter) that is free of disease or cracks. Loop the strap securely around the branch, and attach your hammock chair’s suspension via a heavy-duty carabiner.
Q) Can I use a portable stand instead of permanently mounting my hammock chair?
Yes, a portable stand is an excellent, flexible alternative to permanent mounting. The main benefits are that no drilling is required, and you can easily move your hammock chair to different locations indoors or outdoors. Considerations include that stands take up floor space, and you must ensure the stand’s weight capacity and dimensions are suitable for your specific hammock chair.
Q) My hammock chair is squeaking/uneven/feeling wobbly – what should I do?
- Squeaking: Often indicates friction between metal parts. Apply a small amount of lubricant (like WD-40 or silicone spray) to the contact points of hooks, swivels, and springs.
- Uneven: Re-check your measurements and the connection points. Adjust the length of the chain or rope as needed to ensure the chair hangs level.
- Wobbly: STOP USE IMMEDIATELY. This is a serious safety concern. Carefully re-inspect every piece of hardware, the anchor point, and all connections for any signs of loosening, damage, or stress. If you cannot identify and fix the problem, or if you are unsure, do not use the chair and consult a professional. Your safety is paramount.